
Home > Log Home- Protection
Protection
Protecting Your Log Home Against Rot
 We have been helping log home owners prevent and repair rot damage in their homes for decades. Log homes are big and there’s a lot of wood and often that wood is of unknown quality. It may be beginning to rot before it is even in place. You just don’t know. It will certainly be subject to the environmental conditions which can lead to rot after it is constructed.
Logs can be damaged by UV, moisture, and insects. A lot of customers call asking about what finish they should put on the log to preserve it. In our experience, what finish is used can help prevent UV damage, but doesn’t do much to prevent moisture or insect damage. And since they are so thin, most log finishes are not great at long term UV protection.
Keeping moisture and insects out of the wood is the most important preservation that can be done. And understanding how they are getting in the wood is key to preventing the damage. Keeping moisture out of the wood is easier than insects, truthfully. But insects do like softer wood, so rot and insects are often seen together. Just keeping the wood from rotting can help with insect damage, depending on the insect species.
Preventative Measures: General
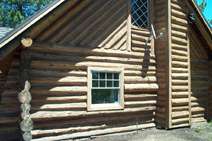
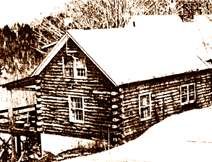
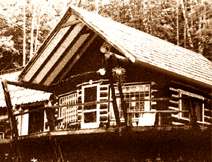
•Keep rain water off the logs! Many log homes are designed without adequate roof overhangs. The result is that the logs are constantly wet in bad weather, and wet wood, some air and a little warmth are perfect for the propagation of rot fungi. Take a look at the pictures here. The first is a large log home, tall, and with minimal roof overhangs. Extend those overhangs by several feet, as the folks did in the second picture, and you are adding some protection to your walls. Nothing you can put on the logs, with the exception of coating them in epoxy, is going to keep all the water out. Builders and log protectant people may tell you otherwise, but it isn’t true. Like wooden boats, log homes are going to take in water. While it is difficult to keep all the moisture out of the wood, it is not necessary in order to achieve good prevention. If the amount of water getting in is equal or less than the evaporation, the moisture content of the wood will stay below the minimum threshold that rot fungi need to propagate.
Know before building from which direction the wind-blown weather comes, and on that side of the home take special precautions with long overhangs and foundation walls to protect the logs and keep them well away from the ground. A porch with a roof can be very helpful.
•Protect decks with roofs or large overhangs, or at least have gutters on the roof above the deck to keep the water from falling directly onto the deck. The water hits the deck near the wall, splashes against the sill log and first log courses and you have the potential for problems.
•Don’t build your log home too close to the ground - put it up on a non-wood foundation. Water splashing from the ground to the logs equals wet logs, and wet logs equals almost certain rot.
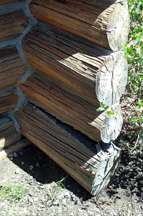
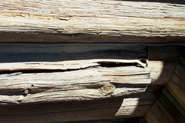
•Avoid long log overhangs on the ends and corners. A few inches overhang is plenty. The long overhangs are just channels to get water to the inner parts of the log, where conditions for rot and deterioration are ideal. We know… the overhangs are part of the rustic look. If you gotta do it, then at least apply the S-1™ Clear Penetrating Epoxy Sealer generously to the end grain of the logs, and to all checks and cracks for the protection of the wood. And don’t allow the tops of the log overhangs to be flat, which only adds to the problem.
•Make sure chimney and gable dormers are properly flashed. This is a problem in any home, but it’s worse on a log home. If you see water leaking into the home, you can be sure it’s also saturating the logs.
•Make sure all windows and doors are flashed above the trim top, or at least have a log with a positive drip edge.
•Exterior sealing between the logs is essential. Systems such as the grooves with tape sealants are not enough. The water will get in.
Preventative Measures: Using Penetrating Epoxy Sealer
•Make an active search for wood problems. Open cracks, checks, soft wood, deterioration, rot - and apply the S-1™ Clear Penetrating Epoxy Sealer when the weather is dry. Epoxy will not displace water in wet logs. If you catch it when the wood is dry, you can act immediately to correct and repair. If you wait, the weather will turn on you and it will be too late. The good news is that rot is a slow process, generally, and the wood will still be treatable the following spring.
Basically, we suggest that every area of potential rot be coated with the S-1™ Clear Penetrating Epoxy Sealer. We make some specific suggestions below. You must remember this: There are a wide variety of surface sealers and caulking compounds available and featured on the log home web sites, but none of them are penetrating epoxies! Many will not penetrate very far and none will reconstitute wood that is beginning to decay or is decayed. Their protection, if any, is limited. Wood soaked in epoxy will last almost indefinitely. Rot fungi and insects will not eat it or chew into it. Water and weather will not wash it away. You can put whatever you want on after the S-1™ Clear Penetrating Epoxy Sealer, but it is the S-1™ Clear Penetrating Epoxy Sealer that will do the protecting. The S-1™ Clear Penetrating Epoxy Sealer will penetrate through and around wood soaked with water/borate solutions that have had time to dry first. But we still recommend the S-1™ Clear Penetrating Epoxy Sealer first.
Pay special attention to the following areas:
1. Checks, knots and log ends
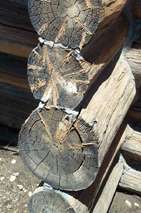 Checking, and knots that can trap moisture are the number one reason that logs will rot. Using the S-1™ Clear Penetrating Epoxy Sealer by itself, to seal the wood, will keep most of the trapped moisture from getting into the log. If you follow that up with a durable, flexible caulking material, all the better. Then the water doesn’t get in the crack in the first place. While a thick, rigid fill like the General Purpose Epoxy™ Resin and Sculpwood® epoxy fillers, Putty or Paste we sell can be a durable fill, we also offer good quality flexible polyurethane caulks that will move as the log swells and shrinks from humidity changes and other moisture moving in and out of the wood. Stay away from acrylic, latex, or even silicone caulks, as they are not as durable as a good flexible polyurethane, for several reasons. For larger checking, a backing rod can be used to improve the bond of the caulk to the sides of the crack. It is the cracks that trap water which should be treated. Cracks which don’t catch moisture are best left untreated, these help the wood dry out.
The log ends should have the S-1™ Clear Penetrating Epoxy Sealer soaked in as well. They will accept a surprising amount, which is what you want, because the mixture is wicking deeply into the log. Sure, the epoxy is expensive, but not nearly as expensive as replacing or repairing rotted logs. Apply 2–3 wetting coats, letting each dry for 6–24 hours.
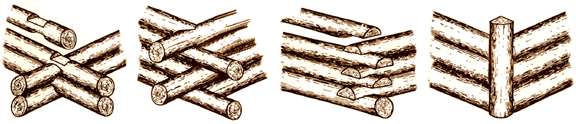
2. Corner Joints
Corner joints… and chinking are a prime area for water entrance into logs. Rot can develop and often will run down the inside of the timber. You may not see it for years. Again, in dry weather, saturate the corner joints with the S-1™ Clear Penetrating Epoxy Sealer. It will follow the same paths as the water and if deteriorated wood is present, it will reconstitute it. In new homes, presoak the corner joints with the S-1™ Clear Penetrating Epoxy Sealer.
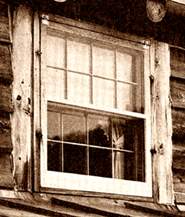 3. Joints and Cracks Around Windows and Doors
The log/frame area around windows and doors is a prime spot for water saturation and rot. The frame rots, the log rots. Even if properly flashed, water can still seep in. Give these areas a good treatment with the S-1™ Clear Penetrating Epoxy Sealer.
4. Interiors
If you have rot outside, there is a possibility that you have it inside as well. Examine especially the inside of sill logs, doorways and window areas. For other interior areas, we refer you the Home Section of our web site. Because of the nature of wood, and rot, it is not nearly as common to have rot on the inside half of the log. Generally, once rot gets started in a section of wood, it will travel laterally, transported through the wood just as the original sap did during growth. So, typically, the outer half of the log can be pretty severely rotted, while the inner half is relatively pristine. But it bears checking the interior as well.
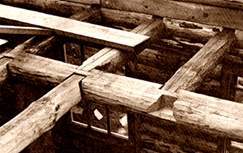
Log home owners need to pay particular attention to high-up joists and girders. Due to the nature of log home construction, water is easily trapped in notches and joints. These need to be inspected periodically, and especially if knowing leaks have occurred in roofs or upper outside walls. Staining from roof drips or other leaks is a good place to check for deterioration. If the leak is minor enough, there can be staining but no damage. The leak needs to be fairly significant, and persistent for the rot to start under most conditions.