Home > Customer Projects > RV Floor Repair

Subject: RV Floor Repair after Toilet Water Supply Leak
Date: March, 2010
Note: all images can be seen in larger versions by clicking on them.
Home > Customer Projects > RV Floor Repair
Date: March, 2010
Note: all images can be seen in larger versions by clicking on them.
PROBLEM: The toilet was not firm on the floor. I removed the toilet from the floor and found the flange gasket intact but the floor rotted around the toilet flange. When removing the toilet, I found the water supply fitting was loose at the toilet. This allowed water to run down the supply line, drip onto the floor, and run unseen over the edge of the vinyl into the flange area of the floor.
Before starting repairs, I did some Internet research and decided on the Rot Doctor CPES* product. This turned out to be a good choice because of the product itself AND the email help I got from Dr. Rot. Following are the steps I took in the repair, with photos for each step:
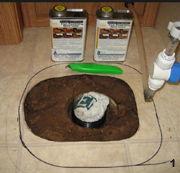
Step One: Removed Toilet and Assessed Damage
Here the toilet and flange are removed. In our case the flange unscrews on its 3″ female thread. Floor is 7/16″ Opposing Strand Board (common roofing called OSB). Roughly a square foot of the floor is rotted. The worst areas look like damp coffee grounds. The coach has a sheet metal bottom under the flooring and there are a couple inches of Styrofoam insulation between. In this picture, I’ve used a “hook blade” in the utility knife and have cut the vinyl floor covering away from the flange area. The footprint of the toilet itself was the pattern for this cut. Thetford sells a “pedestal” which raises RV toilets to home toilet height. The pedestal has a much larger footprint than a toilet, and the faint line on the flooring is the footprint of the pedestal. The dark line is an inch in from the pedestal footprint. I cut the floor covering out along that line.
Between Steps One and Two, I dug out the worst of the rotted OSB until I reached “punky” (spongy) or better material. Tools were a pocket knife and a vacuum cleaner. I laid out the holding tank inlet on a cardboard template and cut the template to fit the space where rotted OSB was removed.
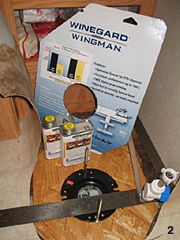
Step Two: Cut New OSB Repair Patch from Template
In this photo, the patch is in place with the flange and pedestal bolts. The cardboard template is shown (and the Winegard WingMan antenna add-on which works very well for DTV, by the way). I’ve cut the floor covering away from the wall behind the toilet and the vanity beside the toilet to gain better access to the damage. I also made a cut near the far rear corner to be able to lift the vinyl out of the way.
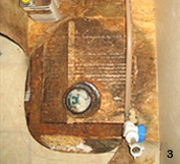
Step Three: Applied Rot Doctor CPES*
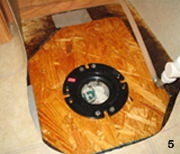
I bought the Warm Weather Two-Pint Unit #101 and mixed several small batches for each application. I dedicated one small jar (about 1-1/2 ounce) to Part A and an identical one to Part B, and kept them separate through all applications. The new OSB patch required two applications before it wouldn’t take any more. The damaged area required four applications and used twice as much CPES* even though the surface area was much less. This shows how CPES* penetrates and fills damaged wood.
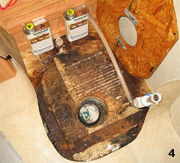
Step Four: CPES* Application Complete
Here you can see how the patch appears shiny. I added aluminum tabs to the bottom side so the stainless steel flange mounting screws have metal to bite into and not just OSB. The damaged wood got firm but not “new wood hard.” I’m confident that rot was arrested and adequate strength restored. Notice that a hole appeared between the two cans. It’s not in an area that anybody can stand on, so I decided to only span it with a small piece of sheet aluminum.
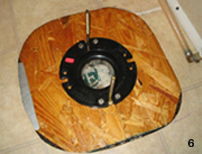
Step Five: Patch in Place, Ready to Reinstall Floor Covering
I put the patch down and tightened the flange firmly into place. I used a carpenter’s square to lay out the mounting holes so the toilet would go back in place straight.
Step Six: Flooring Reinstalled
I used prefinished quarter round molding and predrilled it for drywall screws. I removed the aluminum piece showing here since it kept the pedestal from resting flat on the floor. The white line in the upper right is bathtub sealant covering the one visible cut in the floor covering.
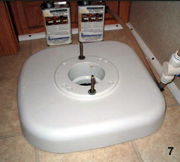
Step Seven: Pedestal Installed – Yes, I removed the Rag!
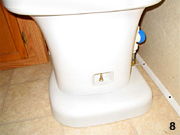
Step Eight: Toilet Installed – Project Complete!
* These products are unavailable, we are selling comparable products that will perform these same tasks. Feel free to contact us if you need assistance with which products to use.
Contact us by phone 206-364-2155 or e-mail (send us your pictures) at drrot@rotdoctor.com and we will gladly answer questions about our products or how to apply them. With 20+ years of experience and many more in the boating and construction industries, not much surprises us. We are here to help our customers solve their issues. Let us help you to not have any surprises in your repair project.
Our business hours are 6:30 AM to 5:30 PM Pacific Time, Monday–Friday.
Tech support is available over weekends and holidays 8:30 AM to 5:30 PM Pacific Time.
The Rot Doctor, Inc.
P.O. Box 30612, Seattle, WA 98113
Voice: 206.364.2155
Fax: 206.364.4744
E-mail: drrot@rotdoctor.com
The Rot Doctor, Inc. ©1997–2021. All rights reserved.