Subject: Using products (log repair)
Date: Thu, 04 Apr 2002Hello.......
Last year I purchased your CPES, Fill-It Epoxy filler & Layup & Laminating Resin. I have yet to use the products. I got some digital pictures of my problem log. Could you pls. take a look and kind of give me an idea of how to use your products. I know I'll have to find some type of filler for the hole,(any ideas?). I think I can finish the outside of the log with a cut piece of fir log semi fitted in and then formed and sanded.
Thanks for your help...... Bryce T.
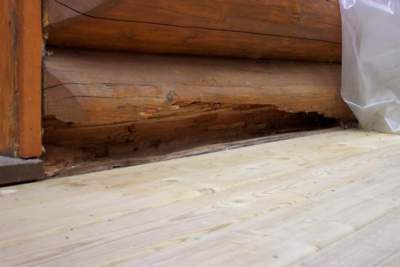
Thanks for the pictures. They are always helpful. The first thing that I would do is make sure how far the damage goes. It appears that water splashing off the deck rotted the bottom of the log. But often the rot travels further in the center of the log. Most times you don't even realize that the log is bad until it is nearly hollow. I would take a thin, stiff piece of metal, something like a fillet knife, and probe the cracks around the visibly damaged area. If you can find soft areas past the obvious damage, you will want to treat these areas as well.
If the damage is contained to just the area in the pictures, you should be in pretty good shape. I would use a spray bottle, either the reusable, chemically resistant type such as the one we sell, or several cheap ones that you can throw away after use. After knocking out any really loose, rotten wood, I would spray the wood inside the cavity with as much CPES as the wood wants to absorb. Spray, wait 1-2 minutes, then spray again. Wait, spray, wait, spray, until the wood seems to not want to soak up any more. Any upward facing crack on the surface of a log is a potential source for water to get into the wood, thus causing rot. So I would be tempted to squirt some into the cracks around the damaged area. This would also help to treat the damaged area.
After the wood seems thoroughly saturated, stop and let things cure for at least one day, and usually several days to a week when dealing with logs. This will give time for most of the solvents in the CPES to evaporate.
Next, rough cut your piece of replacement log to fit in the cavity. Using a putty knife, or whatever tool works the best for you, mix up some Fill-It Epoxy Filler, and smear it into the cracks of the CPES treated hole. After working the Fill-It into all the cracks, you can smear more into the hole, and on the mating surface of the replacement piece. Think thick peanut butter sandwich. This stuff cures white, so leave the visible edges near the outside of the pieces clean. You can fill these in later with some Layup and Laminating resin mixed with sawdust for a wood-colored filler look. Push the replacement piece of wood into the cavity until the Fill-It on both sides squishes together. Prop, wedge, tack in place until the epoxy has a chance to cure.
After the Fill-It has cured, you can dress up any cracks with Layup and Laminating resin mixed with sawdust if you like, and sand/stain the wood as necessary. I would save some of the CPES to treat the areas of the log, both old and new, where water likes to get into the wood. These are the ends and the upward facing cracks. You need to stain first, any area that you are going to treat with CPES, as this stuff keeps water and oils from penetrating the wood. I usually don't recommend treating the face of the log with CPES, but if you have an area that gets lots of water, I would stain to match the rest of the logs, then seal with CPES.
If the rot extends beyond what is visible, I would use one of the repair techniques that are outlined on our website. If you need help in this, or have further questions, please let us know.
Doc